Showing posts with label SAGA. Show all posts

Monday, 5 December 2016

Building a wargaming river

Following on from my last post where I made a table for SAGA, I have decided to make a river to add to my table.

One of the main scenarios in SAGA involves crossing a river with two bridges/fords, and my collection was lacking a river which meant I wasn't able to host this scenario. I looked at several of the commercially available options:

The Pegasus Hobbies river: I don't like the paintjob, it's probably a little narrow, and is also too short (I need a 4' river). Not a bad product though, if you're looking for a quick and easy way to toss a river on your table, and very hard wearing.


The Amera river: Not a bad product at all, and I was extremely tempted by this one! However, being that it is vacuum formed plastic means there is a fair bit of work involved in getting it ready for the table top. You need to cut a base board to size and glue the river down, then trim the edges, sand the whole thing so it will take a coat of glue/paint, then texture and paint it, etc. Frankly, I think there's just as much work involved in making your own river from scratch.


Flat rivers: There are a variety of flat rivers available printed on neoprene sheets that you just lay on your table. Obviously the images are very nice and the river just rolls out where ever you need it, but they're also two dimensional with no depth and that's a deal breaker for me. Have you ever seen pictures of Warmachine tables using nothing but 2D printed terrain? It's just sad.

The GF9 river: Much the same as the pegasus hobbies river, I avoided this one for the same reasons. A very nice product though, and one I was sorely tempted by.


In the end, I decided to build my own. I was being quite fussy about the width and the shape of the banks, so rather than buy something and spend ages trying to adjust it, I decided to just make my own.

I bought a 900 x 1200 x 3 MDF board, and drew a large river on in, between 6" and 7" wide. I cut it out using a handheld coping saw, then used a dremel with a sanding attachment to bevel the edges.

I bought some acrylic builders caulk (it's important to use acrylic! Silicone is NOT suitable for modelling purposes!) to make the banks with. I put two or three layers down, letting each one set before I did the next, and smoothing them out as I went  with a spatula and a wet sponge. I would lay a thick sausage entirely along one bank, smooth it to shape with the spatula, and let it dry a bit. Then I would add the second layer, blend it into the first, and use the damp (not dripping) sponge to smooth out some of the bumps and ridges. You really need to let the caulk set for a two or three days before you sand it. This is the first time I've used this material, and it's great stuff, easy to work with and dries hard. And if you buy an earthy brown one like I did, then it's very forgiving when it comes to painting.

For the water itself I considered several options. There's the resin option, the acrylic artists gel option, varnish, and plain old paint. I discounted the resin due to the size of the project, and after looking at several on-line tutorials I decided I liked the look of the artists gel the most. Unfortunately, the product I used (Derivan artists medium gel) didn't perform quite the way it was advertised. The container said any depth less than 3mm would dry clear. False. While some patches did dry clear, they were MUCH thinner than 3mm. Anything over about 1.5mm stayed cloudy to one degree or another. Also, during the curing process the product develops tiny air-bubbles inside it. Probably not noticeable on a smaller project like a thinner river or a fountain, but for a large 6" wide river it was quite noticeable.

Luckily, the supplies I had bought for the first attempt were more than enough for a second attempt. I decided this time I'm going to try varnish. Resin is the other option but in the amount I'd need it's quite expensive and it would be an unknown entity. I don't know if it will react to the paints I'm using, how much it would shrink, if the shrinkage would warp the MDF I'm using as a base, and at the end of it all you get a gloss mirror finish which isn't very river-like. So I decided to use varnish. Again the width of the river presented some problems, because on such a wide surface any brush-strokes would be very visible. So I opted for a can of spray varnish, and put down several coats. In the end, this didn't provide quite as much coverage as I had wanted, but I can always go back and apply some varnish with a brush, before coating it with spray varnish again to even the texture out.

First I undercoated the entire project in black. Then I sprayed the river a dark green, leaving the centre of the river black the darkest to simulate depth. Then I airbrushed a sandy brown colour on the edges to simulate sandy/earthy shores. At this stage the river looks like this:


Then I followed the same basing technique I use for everything: Paint the shores (which were covered in sand to provide texture prior to commencing any painting) in dark brown, drybrush in light brown, then bone. Then apply static grass, leaving patches of earth showing through, before applying foliage, tufts and flowers/weeds. I used tufts from Gamer's Grass which I am really happy with. I've been using these tufts for basing models and terrain for a little while now and have no complaints at all.

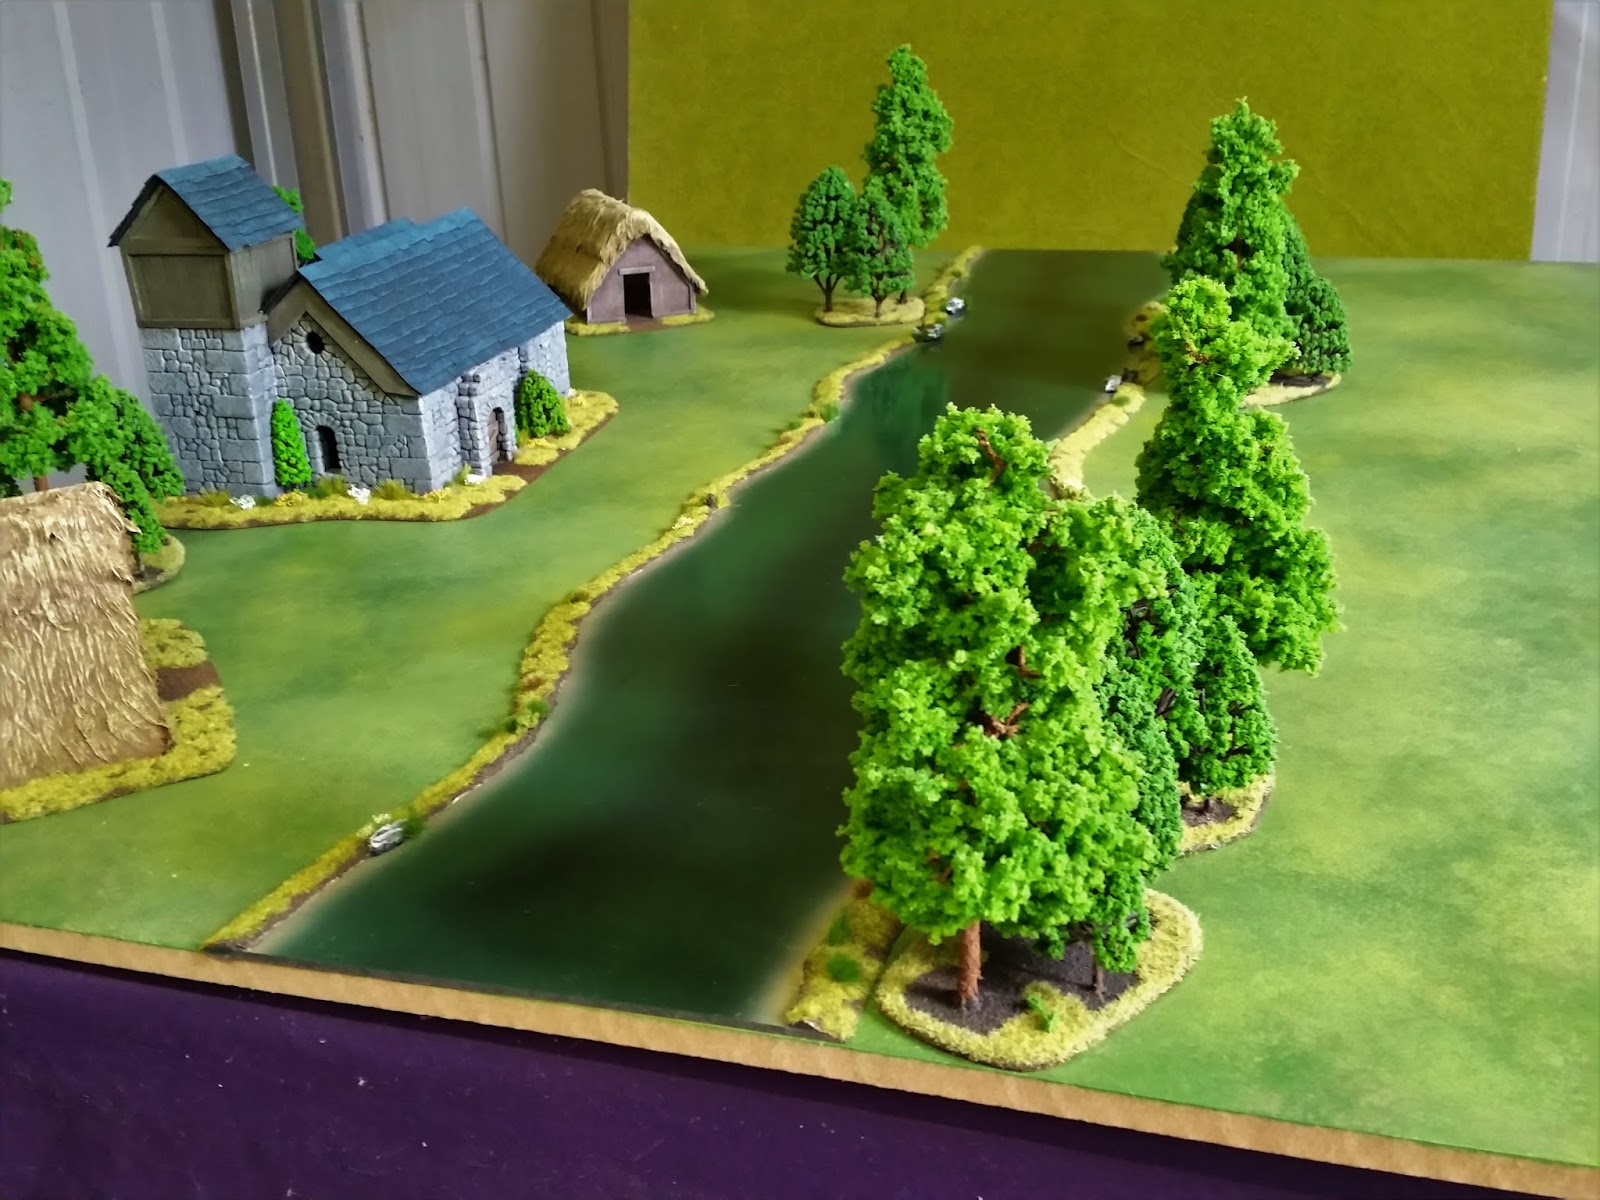
Here you can see the finished product, a small village nestled against the banks of the river:


Saturday, 1 October 2016

Ragnarok 2016

A few weekends ago I had the pleasure of attending Ragnarok 2016, a SAGA tournament in Melbourne hosted by the League of Ancients. This was a really terrific event, with a laid back atmosphere, and a great venue.

The tournament was held on the Sunday, as it was timed to coincide with League of Ancients regular monthly meeting, held on the third Sunday or each month. The wife and I stayed in Melbourne for the weekend, and she did some shopping while I played toy soldiers. A win-win weekend away!

I had wanted to take an Anglo-Saxon warband led by Alfred the Great, but the Northern Fury sourcebook that contains the Anglo-Saxon list is currently out of print and my copy didn't make it to me before the event. So I went with plan B, which was a Viking warband led by Harald Hardrada and including 8 Varangians. I had wanted to include 12, but in the week before the event Studio Tomahawk released a new FAQ/Errata and reduced the maximum unit size for Varangians from 12 to 8. Oh well, them's the breaks!

My warband was:

Harald Hardrada
8 Varangians
2 x 8 Warriors
4 Berserkers


Game 1 was against Pip's 'Anglo-Danish' warband. Pip had elected to take Hereward the Wake ('the wake' meaning 'the watchful') as his warlord. Hereward unlocks Flemish Mercenaries for your warband, and gives them access to the AD battle-board abilities. The Flemish Mercs natural defensive abilities (armour 5, and always counting as being in hard cover) coupled with the naturally defensive flavour of the Anglo-Danish battle board makes these warriors formidable to say the least.

Our scenario was Clash of Warlords, which is basically a straight up battle with the condition that you lose the game if your warlord dies. Pip made the mistake of deploying one of his units of Mercenaries far off to his right flank, and since Flemish Mercs can only move S, I was pretty confident they were out of the game. In the picture below you can see the table as it lies after the first turn. You'll have to forgive the photos, the lighting wasn't great and I was using my phone.


I deployed centrally, hoping to get a big haymaker in and knock out Pip's warlord early in the game. Pip deployed Hereward surrounded by two units of Mercenaries. I had hoped to be able to draw Hereward out by placing my warlord at M of him, while being outside of S of his bodyguards. But Pip was a canny opponent and kept Hereward well shielded. I made the mistake of charging Harald and his Varangian bodyguard into some Flemish Mercs with a loaded battle board, and the result was from my 21 attacks, I landed 17 hits. Of which Pip saved 16. Now sure, he had some pretty good abilities loaded, but still! 16 saves from 17 hits! The picture below shows my Varangians and Warlord having bounced off the Flemish shieldwall, fatigued and isolated. Oh dear.


Needless to say, my haymaker swing come unglued pretty quickly and the game evolved into a cat-and-mouse match with each of us trying to pin the others warlord down. In the end, our warlords dealt each other their death-wounds in the same combat, and the game ended in a draw. The picture below shows the board on my final turn. From here, the Berserkers (behind the spear armed Bondi warriors) were moved up and charged into Hereward alongside Harald, both of whom were slain in the ensuing combat.


Due to the constraints of the dice and the need to win this round or have my warlord slaughtered in the next, the Berserkers had to accompany Harald. In the end, I used Valhalla on them and sacrificed three of them for extra attacks. It turned out to be overkill, and also fatal for Harald since he had only a single 'bodyguard' on whom he could redirect a wound, and as a result Harald fell, turning a potential win into a draw. Well played Pip! In hindsight I probably could have kept Harald back from the fray and just let the Berserkers do their thing, but I got caught up in the theme of the game and the heat of the moment, and so Harald went in swinging!

Game 2 was against Steve's Scots. Our scenario was a pure victory points knock-em-down and drag-em-out game. Steve deployed in a solid line of warriors with hearthguard support, which gave me pause. Any unit that I isolated and picked on would probably be destroyed, but would also leave my units isolated and surrounded. You can see our deployments in the picture below.


As it turned out, I managed to get a triple activation going in my turn which resulted in the destruction of a Scottish Hearthguard and Warrior unit, and also left his warlord within Warlord's Pride range: when a warlord activates for a 'move' and he is within a single move of the enemy warlord, then he MUST engage the enemy warlord. Due to some lucky positioning on my part, Steve's warlord was unable to activate any of his units for a Side by Side move, which is where the warlord drags a friendly unit with him to fight in the combat. You can see the situation in the picture below. Steve's warlord, if activated, must engage my warlord. His hearthguard are too close to my Varangians to do anything except charge them, and his warriors are too far away to accompany his Warlord.


Nevertheless, the ensuing Scottish counter-attack was bloody. Steve's warlord was slain, and his warriors defeated and forced to withdraw. The Vikings took heavy casualties, with only a handful of models surviving, but a handful was more than the Scots had remaining and with the death of last of the Scottish warriors, the Scots lost their ability to generate SAGA dice, and therefore lost the game. NB: When your warband is unable to generate any SAGA dice, then you automatically lose the game.

Game 3, the final round, was the Feast for Crows multiplayer scenario vs Christian's Jomsvikings and Tylers Saracens. Clearly two separate bands of Norse mercenaries fighting for the Byzantines, with their own grudge to settle! Early game sees my Varangians take out a unit of Saracan HG, but then become entangled with an unwinable war of attrition against Bedouin mercenaries. Among their other abilities, these can activate for as many times as they want, for free, until they are exhausted. And if you end a move within M of them (and did not engage them in combat) then they get a free move (which also allows them to throw javelins).

Importantly they CAN'T make this free move when exhausted, so the owning player needs to be careful not to leave them exhausted in his own turn or they can be caught and killed.


The Saracens and Jomsvikings slug it out, and by the end of the 7th turn there is only a handful of models left on the board, with the Saracens being ever so slightly ahead in points. Tyler finishes on 23 points, I'm on 20, and Christian on 17. As the game was finishing I realised there was a priest in the building you can see in the picture, and my Varangians had spent many turns just sitting outside the building doing nothing when they could have been inside butchering the priest! Oh well, something to remember for next time!

Overall I think the Vikings finished in fourth or fifth place, from a field of 14 or 16 or something like that. I forget exactly. I was happy with my performance, and can see where I made mistakes and where I will need to pay attention in the future. I also met lots of great people, played three fantastic games, and got to use some models I'd never used before. And the wife got to do lots of shopping and we got a nice weekend away in the city, so everyone was happy! I'll definitely be marking this one on my calendar for next year, and hopefully I can drag a few of the local gamers along with me as well.

Final thoughts:

1 - Ragnarok is cool.
2 - The League of Ancients seem like cool guys.
3 - Don't take unnecessary risks with your warlord.
4 - Be well aware of what all the pieces on the board are, and where they are.

Monday, 4 July 2016

SAGA at Pandacon

This weekend I got to play some games of SAGA at a great new little convention in Melbourne.

The Pandacon is the product of Kayjays games store and café, and this was the inaugural event. There were a couple of teething problems as happens with any new event. Namely some issues finding my name on the list of attendees, and the venue operators didn’t arrive until just after 9 when the rounds where scheduled to start at 9. By the time you factor in all the ‘where are we playing?’ ‘where can I get a coffee?’ ‘does anyone have a spare battle board?’ and the other essential pre-tournament negotiations and pleasantries this meant we were probably an hour or so behind right from the start, which would have ramifications for the rest of the day.

The tournament was 4 points, to be played over three rounds between 9am and 1pm. I had taken Vikings as the idea of running a Vikings warband was what attracted me to SAGA in the first place and I have still, to this point, only played them in about six games. My list consisted of my Warlord (free) two points of Hearthguard, one point of Berserkers and one point of Warriors. Berserkers in SAGA are Hearthguard, who trade two points of defence (lowering them to 3+) for two extra attacks per model. Their low armour makes them extremely susceptible to return attacks and incoming missile fire, so they’re not always the best choice tactically speaking, but they’re very cool and I like them so I took them.

My first game was the Sacred Ground scenario vs Richard’s (nearly) all mounted Milites Christi. This was the first game Richard had played with his Milites Christi, and I haven’t much SAGA experience full stop, so this was a learning game for both of us.

Sacred Ground is a scenario where there are only three terrain pieces. A central hill, and a piece to the left of it and a piece to the right. I chose a forest to be placed to the right of the hill, and Richard chose a piece of scrubland to be placed to the right. The name of the game is to get as many of your models into those terrain pieces as possible, and to keep them there as long as possible. I rushed my right flank, stacking models into the forest while Richard rushed my left, stacking his troops into the scrubland.  I also moved my unit of Warriors onto the central hill.

Richard’s warband featured a unit of eight crossbow armed warriors, who now started to fire their bolts into my warriors who hunkered down behind their shields to weather the storm. At this point I realised that I couldn’t afford to simply hold the central hill, since Richard’s crossbowmen would tip the balance in his favour. So I rushed my Hearthguard unit out from the forest where they were sheltering on my right flank, and caught a unit of Richard’s mounted warriors unawares. They then used several activations to get back into position on the central hill. The crossbowmen continued to be a problem, but through judicious use of the Odin ability (turning a shoot into a move) and manipulation of fatigue I was able to keep casualties to a minimum. I still lost all my warriors, and eventually had to charge my berserkers into the crossbowmen to end their threat once and for all.

The state of the board in the mid game. You can see my Hearthguard on the right, having destroyed some of Richard's mounted warriors, and you can see my lone Warrior and my Berserkers on the hill, being threatened by the Milites Christi crossbowmen to their left. Unfortunately during the heat of the moment I neglected to take any more in-game photos on the day!

I had initially wanted to send my Berserkers into the eight man mounted Hearthguard unit that Richard was keeping in reserve on my left. But after taking a couple of casualties from the crossbows they were too depleted for that task, and the crossbows were presenting a thorn in my side and needed to be dealt with. So with a cry of ODIN! My berserkers went charging across the table and after a furry of axes and a spray of blood, not a single figure was left standing.

By now I was slightly ahead in points since my warriors had died while standing on the hill earning points, while Richard’s had died standing in open ground. Yes, he’d forced my hand, but not until I’d earned a handful more points than him.With the last turn looming Richard sent his eight man Hearthguard cavalry unit crashing into my eight man Hearthguard unit occupying the central hill. It was to be a pretty even battle, but since I was ahead on points I only needed to not die, while Richard needed to defeat or at least heavily deplete my forces. I traded in as many of my attack dice for defence as I could, and kept the melee to a draw forcing Richard to withdraw. Final tally of points was 55.5 to me and 52 to him, a VERY close game!

My second game was against Tyler with his all cavalry Saracens. Our scenario was the Challenge, and the objective was to slay the enemy warlord. In this scenario, both warlords deploy in the centre of the table, while the rest of your warband deploys normally.

Given that Tyler’s entire warband was mounted, AND he would have the first turn, I was worried that he would gain a strong advantage in the first turn. But luckily for me the dice were not with him and his forces inflicted only a handful of wounds.

In my turn, I managed to triple activate my Berserkers into his warlord, using Ullr to re-roll misses, and Frigg and Njord to shed fatigue. After the dust had settled, I had inflicted 11 wounds on Tyler’s warlord. Just 1 shy of killing him! Now that Tylers warlord was so close to death he had to be very careful with him, activating his units to shield him from harm and not being confident enough to send him into combat. This gave me an edge that allowed me to engage the rest of Tylers warband piece-meal in decisive engagements. Once again the Bersekers were wiped out, but they had more than done their job and went to Valhalla with a smile on their faces.

By the mid-game, Tyler’s entire warband was destroyed bar his Warlord, where I had six Hearthguard, my Warlord and eight warriors. In a last ditch attempt to take the last four hits off my warlord, Tyler engaged me in combat but it wasn’t to be, and his warlord was cast down and a pagan banner raised over the battlefield.

Now, there was to be a third round for the event, but given that we had gotten off to such a late start and we had another group wanting to utilise the space after 1pm, we decided to call the event there. As I had won both of my games, I was declared winner! I have to say I was pretty surprised and excited to have taken home the top prize at my first ever event, no matter how small it was! Both Richard and Tyler are members of the League of Ancients, a historical wargaming society that meets once a month in Melbourne. They are hosting another, larger event in September and I’ll definitely be attending that one as well. They were both great, laid back opponents and I learned a lot about the intricacies of the rules that I hadn’t previously understood and I hope to be able to make it to some of their monthly meets!


The overall feel of Pandacon was great, very laid back and relaxed with an in-house café and bar, easy to get to with plenty of parking space. I really hope this thing gets some more promotion next year and can draw a bigger crowd!


Saturday, 4 June 2016

SAGA!

SAGA!


If anyone has actually been reading this blog, it might seem that the only game I play is X Wing. This is not the case! I love X Wing and Star Wars in general, but have been playing wargames since 1994 and I was lining up my little Napoleonic soldier and making pew-pew noises long before that!

While I have models for a wide range of games, if I'm honest I really only play a handful of them. Most of the models sit in storage, hopeful of one day being the flavour of the month again. My current passion is SAGA, and now that I have a regular opponent I'm hopeful of it being one of my gaming mainstays since I absolutely love it. The game play is simple, the application of the different factions battle boards is complex without being complicated, the forces are small enough to be easy to prepare and reasonably priced, it plays on a small board (36" by 48") and it features Vikings, Saxons, Franks and other Dark Ages factions for which I have a passion.

Basically, SAGA is a dark ages skirmish game. It features anywhere from 25 to 73 figures (one of which will always be your Warlord) in units ranging from 4 to 12 models. Models for all factions are broken down into three broad types. Levies are your conscripted peasants, unwilling warriors forced to fight for their lord. Warriors are the men who form the backbone of your force, stern and determined men. Hearthguard are the born warriors who love to fight, the elite and highly trained core of a Warlords forces. These are your Viking Hirdmen or Saxon Thegns.

Each faction shares these three classes of warrior, but many have some small variation within them. For instance, the Welsh may take lots of javelins on their units, the Normans may mount their warriors and hearthguard on horses, the vikings can take one unit of hearthguard as berserkers, etc. Further flavour is given to each faction by their battle-boards.


Each faction has SAGA dice. These dice are rolled at the start of each turn, and may be placed on the corresponding box on their battle board. This gives a player a range of choices to make, varying from how many dice to roll (you get one dice for each unit, and two for your warlord to a maximum of 6 dice. Levy units don't generate dice) to where to place those dice after they're rolled. Activating a unit costs a dice, so you need to balance the cool abilities on your board with the need to activate your units at all. And each faction has wildly varying battle board abilities so, despite sharing common troop types, each faction plays very differently and in many cases each faction can be played in a variety of ways, depending on which types of builds you prefer and which battle board abilities you favour.

SAGA is not a dry historical simulation game. The game and it's effects are gamey, but never so much so that they break the theme. If you're looking for something historically accurate, this game is not for you. But if you're looking for a tight, fun skirmish wargame where your Vikings can plunder and pillage the Saxon lands, then SAGA is right up your alley.

And one of the things I love about SAGA as opposed to X Wing or Armada is that not only is it a much more traditional wargame (no faffing about with tokens and upgrade cards!) but I get the opportunity to make my own terrain and paint my own figures! Yes, I know I can do this with X Wing but there's much less motivation when all the bits are provided pre-painted with press-out terrain. I've been happily putting together all sorts of plastic soldiers and buildings and forests and stuff:

This church was built using plaster bricks made from Hirst Arts molds, with a roof made from cardboard tiles and mounted on an MDF base.


These four buildings form a village which was the scene of three battles last weekend, with my Vikings being victorious twice, but then get trounced in the third game by the Irish!. They're made from balsa wood for the frame and walls, with teddy-bear fur roofs and MDF bases.

The bases aren't finished, since I ran out of tufts and flowers and what-not, and they need some extra detail like spears leant against door frames, shields hung on walls, stacked firewood, etc, but they're finished enough to see some action on the table top.

And of course, there are the models themselves!


My Viking Warlord and his faithful banner bearer.


His loyal retainers, 8 Hearthguard.


And some frothing loonies, 4 Berserkers! I've decided to go with the 'warrior cult of Odin' interpretation, rather than naked lunatics with wolf-skin hats. These guys have an increased attacks value, but reduced armour.

Overall, I've gone for a darker palette with the Vikings to make them look more menacing. Their opponents, the valiant Anglo-Danes, have some brighter colours:


Here are my Anglo-Dane Warlord, and his noble Thegns.

The models are all plastic from Gripping Beast and the shields make use of transfers from Little Big Men Studios.